Category: CSS HTML

เนื้อหาเกี่ยวกับ CSS และ HTML

  • [CSS] ข้อแตกต่างระหว่าง width:auto กับ width:100%

    [CSS] ข้อแตกต่างระหว่าง width:auto กับ width:100%

    ในการทำเว็บนั้น เราอาจจะเจอกรณีที่ layout ต้องเปลี่ยนไปตามความกว้าง เช่น เวลาทำเว็บที่เป็น responsive หรือเวลาที่สั่งพิมพ์ทางเครื่องพิมพ์ ตามปรกติแล้ว เราจะเคลียร์ค่า float หรือ width

    โดยการเคลียร์ค่า float นั้น เราก็เพียงสั่ง float:none แต่ในการเคลียร์ค่า width บางคนกลับใช้ width:100% แทนที่จะเป็น width:auto

    โดยพื้นฐานแล้ว บรรดา element ที่มีคุณสมบัติเป็น block อย่างเช่น div หรือ p พวกนี้จะมีความกว้างเป็น auto โดยมาตรฐาน แล้ว width:auto กับ width:100% มันต่างกันยังไง

    width:auto vs width:100%

    วิธีที่ทำให้เราเข้าใจ และเห็นภาพมากที่สุด ก็คือ เขียนให้มันแสดงผลมาให้เราดูครับ งั้นเรามาลองดูกันเลยครับ

    กล่องนี้มีความกว้าง 400px

    กล่องนี้ตั้งความกว้างเป็น width:auto
    มี padding ซ้ายขวา 50px
    มี margin ซ้ายขวา 50px
    และมีกรอบหนา 10px

    กล่องนี้ตั้งความกว้างเป็น width:100%
    มี padding ซ้ายขวา 50px
    มี margin ซ้ายขวา 50px
    และมีกรอบหนา 10px

    width:auto นั้นจะคำนวนมาให้ความกว้างพอดีกับกล่องที่คลุมไว้ โดยความกว้างของสีแดงที่เห็น จะมีค่าเท่ากับ 280px (มีค่า padding ด้านละ 50px รวมอยู่ใน 280px ด้วย) เมื่อรวมกับ border และ margin แล้วจะมีค่าเท่ากับ 400px พอดี แต่ถ้าเราตั้งค่าเป็น width:100% แล้ว ความกว้างของกล่องสีน้ำเงิน จะมีค่าเท่ากับ 500px ซึ่งมาจาก 400px บวกกับ padding ซ้ายขวาอย่างละ 50px ทำให้ตัวกล่องสีน้ำเงิน เกินออกมาจากกล่องสีเทาที่คลุมอยู่

    จากตัวอย่างน่าจะทำให้เข้าใจความแตกต่างระหว่าง width:auto กับ width:100% บ้างนะครับ ยังไงก็ลองเอาไปปรับใช้งานกันนะครับ

  • [HTML] : HTML Ipsum

    [HTML] : HTML Ipsum

    ในการทำเว็บ เชื่อว่าหลาย ๆ คนต้องรู้จักกับ Lorem Ipsum ถ้าใครยังไม่รู้จักก็ไปดูที่นี่เลยครับ lipsum.com ให้เปรียบเทียบ Lorem Ipsum ก็เหมือนกับข้อความตัวอย่างแบบนี้ครับ

    Lorem ipsum dolor sit amet, consectetur adipiscing elit. Vestibulum lacinia, dolor sit amet tincidunt iaculis, lacus est rutrum nibh, at dapibus felis leo sit amet ipsum. In blandit blandit neque non laoreet. Pellentesque eleifend mollis lectus vitae aliquam. Proin diam augue, ultricies vitae viverra sed, aliquet sit amet leo. Fusce sem turpis, eleifend non cursus id, condimentum quis nulla. Nam consectetur feugiat enim, aliquet fermentum quam consectetur eget. In placerat aliquet ipsum, in dictum nisi dapibus ut. Pellentesque nisl mi, tempus non convallis non, porttitor eget neque. Vestibulum pulvinar facilisis diam volutpat volutpat. Nunc adipiscing, quam et tincidunt aliquet, orci velit posuere nisl, a eleifend orci ligula non ipsum. Class aptent taciti sociosqu ad litora torquent per conubia nostra, per inceptos himenaeos. Aliquam sodales, urna at sollicitudin vulputate, velit neque aliquam lacus, ac ornare enim sapien nec quam. Nulla dignissim ullamcorper lacus, eget varius metus scelerisque nec. Sed iaculis sodales gravida. Sed aliquam, erat eget semper viverra, sapien urna semper tellus, et suscipit enim nisi ut nisl.

    สำหรับเว็บ lipsum.com นั้น เราก็จะได้เพียงข้อความมาใช้ในเว็บ แต่ผมจะแนะนำอีกเว็บนึงครับนั่นคือ HTML Ipsum

    HTML Ipsum

    สำหรับเว็บ HTML Ipsum นั้น ก็จะมี code สำหรับใช้เป็นตัวอย่าง อย่างเช่น form ตัวอย่าง

    [html]
    <form action="#" method="post">
    <div>
    <label for="name">Text Input:</label>
    <input type="text" name="name" id="name" value="" tabindex="1" />
    </div>

    <div>
    <h4>Radio Button Choice</h4>

    <label for="radio-choice-1">Choice 1</label>
    <input type="radio" name="radio-choice-1" id="radio-choice-1" tabindex="2" value="choice-1" />

    <label for="radio-choice-2">Choice 2</label>
    <input type="radio" name="radio-choice-2" id="radio-choice-2" tabindex="3" value="choice-2" />
    </div>

    <div>
    <label for="select-choice">Select Dropdown Choice:</label>
    <select name="select-choice" id="select-choice">
    <option value="Choice 1">Choice 1</option>
    <option value="Choice 2">Choice 2</option>
    <option value="Choice 3">Choice 3</option>
    </select>
    </div>

    <div>
    <label for="textarea">Textarea:</label>
    <textarea cols="40" rows="8" name="textarea" id="textarea"></textarea>
    </div>

    <div>
    <label for="checkbox">Checkbox:</label>
    <input type="checkbox" name="checkbox" id="checkbox" />
    </div>

    <div>
    <input type="submit" value="Submit" />
    </div>
    </form>
    [/html]

    หรือแค่ list ตัวอย่าง

    [html]
    <ul>
    <li>Lorem ipsum dolor sit amet, consectetuer adipiscing elit.</li>
    <li>Aliquam tincidunt mauris eu risus.</li>
    <li>Vestibulum auctor dapibus neque.</li>
    </ul>
    [/html]

    ถ้าสนใจลองเข้าไปในเว็บ HTML Ipsum เลยครับ

    ที่มา : HTML Ipsum
  • [HTML] [CSS] tag ต่าง ๆ และ CSS ที่เกี่ยวกับ list

    [HTML] [CSS] tag ต่าง ๆ และ CSS ที่เกี่ยวกับ list

    สำหรับ tag ของ HTML นั้น มีชุดของ tag อยู่ชุดนึง ที่ใช้สำหรับบอกถึงความเป็นรายการ หรือ list ซึ่ง tag ที่เกี่ยวกับรายการนั้นจะมีดังนี้ (คำภาษาไทยเนี่ย ผมคิดเองนะครับ ไม่ได้เป็นคำที่เป็นทางการอะไร)

    • รายการที่ไม่มีลำดับ (Unordered list) tag คือ ul
    • รายการที่มีลำดับ (Ordered list) tag คือ ol
    • รายการที่มีความหมาย (Definition list) tag คือ dl

    ul li

    สำหรับ tag ul นั้น เราจะใช้คู่กับ tag li

    [html]
    <h4>An Unordered List:</h4>
    <ul>
    <li>Coffee</li>
    <li>Tea</li>
    <li>Milk</li>
    </ul>
    [/html]

    ผลลัพธ์ออกมาเป็นแบบนี้

    An Unordered List:

    • Coffee
    • Tea
    • Milk

    ol li

    สำหรับ tag ol นั้น เราจะใช้คู่กับ tag li

    [html]
    <h4>An Ordered List:</h4>
    <ol>
    <li>Coffee</li>
    <li>Tea</li>
    <li>Milk</li>
    </ol>
    [/html]

    ผลลัพธ์ออกมาเป็นแบบนี้

    An Ordered List:

    1. Coffee
    2. Tea
    3. Milk

    dl dt dd

    สำหรับ tag dl นั้น เราจะใช้คู่กับ tag dt และ dd โดย dt เปรียบเสมือนหัวข้อ และ dd นั้นจะอธิบายหัวข้อ

    [html]
    <h4>A Definition List:</h4>
    <dl>
    <dt>Coffee</dt>
    <dd>Black hot drink</dd>
    <dt>Milk</dt>
    <dd>White cold drink</dd>
    </dl>
    [/html]

    ผลลัพธ์ออกมาเป็นแบบนี้

    A Definition List:

    Coffee
    Black hot drink
    Milk
    White cold drink

    CSS กับ List

    เราสามารถกำหนดรูปแบบของ List ได้ด้วยคำสั่งเหล่านี้

    • list-style-image สามารถนำรูปแบบใช้แทน bullet มาตรฐานได้ ตัวอย่างการใช้งาน list-style-image:url(images/bullet.png);
    • list-style-position กำหนดตำแหน่งของ bullet โดยมีสามแบบคือ inside outside และ inherit
    • list-style-type กำหนดลักษณะของ bullet อาจจะเป็นสี่เหลี่ยม เป็นวงกลม เป็นเลขโรมัน หรือเป็นตัว A B C ก็แล้วแต่เรจะกำหนด อย่างเช่น list-style-type:upper-alpha; แบบคือเราต้องการให้ bullet เป็นตัวอักษร A B C
  • วิดีโอสอนพื้นฐานของ HTML CSS Javascript จาก Google

    วิดีโอสอนพื้นฐานของ HTML CSS Javascript จาก Google

    ในการจะเรียนรู้ HTML CSS นั้น ผมคิดว่าในตอนนี้ไม่น่าจะเป็นเรื่องยากแล้ว เพราะมีข้อมูลความรู้มากมายในอินเตอร์เน็ตให้เราค้นหา ให้เราศึกษา และนี่ก็เป็น 1 ในนั้น มันคือ วิดีโอที่ทาง Google ได้ทำขึ้นเพื่อสอนพื้นฐานของ HTML CSS Javascript เรามาดูกันเลยดีกว่าครับ

    แนะนำให้รู้จัก HTML CSS Javascript

    HTML

    แนะนำให้รู้จัก HTML

    แบบฝึกหัดในหัวข้อ HTML

    CSS

    แนะนำให้รู้จัก CSS

    สอนใช้ CSS เบื้องต้น

    แบบฝึกหัดในหัวข้อ CSS

    JavaScript

    แนะนำให้รู้จัก JavaScript

    แบบฝึกหัดในหัวข้อ JavaScript

    HTML CSS เนี่ยผมว่าไม่ยากที่จะเรียนรู้หรอกครับ อย่าคิดว่ามันยาก ถ้ายังไม่ได้เริ่มที่จะเรียนรู้มันนะครับ ^^

  • CSS : แต่งกล่อง Facebook Like Box กัน

    CSS : แต่งกล่อง Facebook Like Box กัน

    เพิ่งไปเจอมา เลยเอามาเขียนไว้เผื่อใครยังไม่รู้ จริง ๆ แล้วเราสามารถกำหนด Stylesheet ให้กับตัว Facebook Like Box ได้นะครับ

    [html]
    &lt;div class=&quot;sidefb&quot;&gt;
    &lt;script type=&quot;text/javascript&quot; src=&quot;https://connect.facebook.net/en_US/all.js#xfbml=1&quot;&gt;&lt;/script&gt;
    &lt;script type=&quot;text/javascript&quot;&gt;FB.init(&quot;1690883eb733618b294e98cb1dfba95a&quot;);&lt;/script&gt;
    &lt;fb:fan profile_id=&quot;ใส่ id จาก facebook&quot; stream=&quot;0&quot; connections=&quot;8&quot; logobar=&quot;0&quot; width=&quot;ใส่ความกว้าง&quot; height=&quot;ใส่ความสูง&quot; css=&quot;ใส่ css ลงไป?1&quot; rel=&quot;stylesheet&quot; type=&quot;text/css&quot;&gt;&lt;/fb:fan&gt;
    &lt;/div&gt;&lt;!– .sidefb –&gt;
    [/html]

    ตรง css= อย่าลืมใส่ ?1 และเปลี่ยนเป็น 2, 3, 4, … ทุกครั้งที่ทำการเปลี่ยนค่า css ในส่วนที่เราจะแต่ง Facebook Like Box ด้วยนะครับ อย่างเช่น ทำครั้งแรกก็ใส่เป็น css="stylesheet.css?1"

    ผมก็เอามาประยุกต์ใช้กับ sidebar ด้านขวาของผมเหมือนกัน ใน Code ของ Theme WordPress ผมใส่แบบนี้ครับ

    [php]
    &lt;div class=&quot;sidefb&quot;&gt;
    &lt;script type=&quot;text/javascript&quot; src=&quot;https://connect.facebook.net/en_US/all.js#xfbml=1&quot;&gt;&lt;/script&gt;
    &lt;script type=&quot;text/javascript&quot;&gt;FB.init(&quot;1690883eb733618b294e98cb1dfba95a&quot;);&lt;/script&gt;
    &lt;fb:fan profile_id=&quot;235867876471637&quot; stream=&quot;0&quot; connections=&quot;8&quot; logobar=&quot;0&quot; width=&quot;237&quot; height=&quot;225&quot; css=&quot;&lt;?php bloginfo(‘stylesheet_url’); ?&gt;?1&quot; rel=&quot;stylesheet&quot; type=&quot;text/css&quot;&gt;&lt;/fb:fan&gt;
    &lt;/div&gt;
    &lt;div class=&quot;sidetw&quot;&gt;
    &lt;a href=&quot;https://twitter.com/Rabbitinblack&quot; class=&quot;twitter-follow-button&quot;&gt;Follow @Rabbitinblack&lt;/a&gt;
    &lt;script src=&quot;//platform.twitter.com/widgets.js&quot; type=&quot;text/javascript&quot;&gt;&lt;/script&gt;
    &lt;/div&gt;
    &lt;div class=&quot;sideg&quot;&gt;
    &lt;div class=&quot;g-plusone&quot; data-size=&quot;medium&quot; data-href=&quot;https://rabbitinblack.com&quot;&gt;&lt;/div&gt;&lt;span&gt;Recommend on Google&lt;/span&gt;
    &lt;/div&gt;
    [/php]

    ส่วน CSS ของผมก็เป็นแบบนี้ครับ

    [css]
    .fan_box .full_widget {padding:10px 3px 20px 3px !important;border:0 none !important;position:relative;}
    .fan_box .connect_top{background: none !important;padding: 0 !important;}
    .fan_box .profileimage, .fan_box .name_block{display: none;}
    .fan_box .connect_action{ padding: 0 !important; }
    .fan_box .connections{ padding: 0 !important;border: 0 !important;font-family: Roboto, Helvetica, sans-serif;font-size: 11px;font-weight: bold;color: #666; }
    .fan_box span.total{ color: #FF4F92;font-weight: bold; }
    .fan_box .connections .connections_grid {margin-right:-10px;padding-top: 10px !important; }
    .fan_box .connections_grid .grid_item{ padding: 0 10px 10px 0 !important; }
    .fan_box .connections_grid .grid_item .name{ font-family: &quot;lucida grande&quot;,tahoma,verdana,arial,sans-serif;font-weight: normal;color: #666 !important;padding-top: 1px !important;}
    .fan_box .connect_widget{ position: absolute;bottom:0px;left:0px;margin: 0 !important; }
    .fan_box .connect_widget .connect_widget_interactive_area { margin: 0 !important; }
    .fan_box .connect_widget td.connect_widget_vertical_center { padding: 0 !important; }

    .sidefb {position:relative;font-size: .85em;color: black;padding:0 9px;line-height: 1px;border:1px solid #DDD;}
    .sidetw {background-color: #EEF9FD;padding: 9px 11px;line-height: 1px;border-top: 1px solid white;border-bottom: 1px solid #EBEBEB;}
    .sideg {background-color: #EEF9FD; font-size: .85em;color: black;padding: 9px 11px;line-height: 1px;border-top: 1px solid white;border-bottom: 1px solid #EBEBEB;}
    .sideg span {margin-left: 2px;display: inline-block;vertical-align: text-top;color: #333}
    [/css]

    ผลลัพธ์ที่ได้ มีลักษณะแบบนี้ครับ

    CSS : แต่งกล่อง  Facebook Like Box กัน
    ลองปรับกันดูนะครับ

    ลองเอาไปปรับแต่งกันดูนะครับทุกคน >_<

  • CSS : เรียน HTML CSS ฟรีใน 30 วัน

    CSS : เรียน HTML CSS ฟรีใน 30 วัน

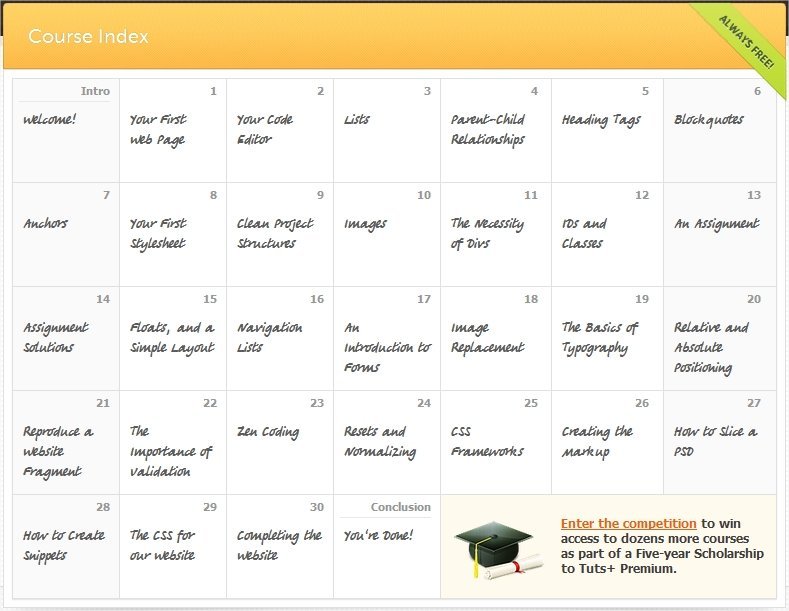
    ผมว่าตอนนี้ HTML CSS น่าจะเป็นความรู้เรื่องแรก ๆ ที่คนทำเว็บ หรือทำเว็บแอพจำเป็นต้องเรียนรู้ แล้วมันจะดีแค่ไหน ถ้ามีให้เราเรียนกันฟรี ๆ เลย

    โดยทาง Tuts+ Premium ได้ทำ Course สอน HTML CSS ใน 30 วัน โดยแบ่งการสอนในแต่ละวันดังนี้

    สนใจแล้วใช่มั้ยครับ งั้นก็ไปที่เว็บนี้เลย 30 Days to Learn HTML & CSS